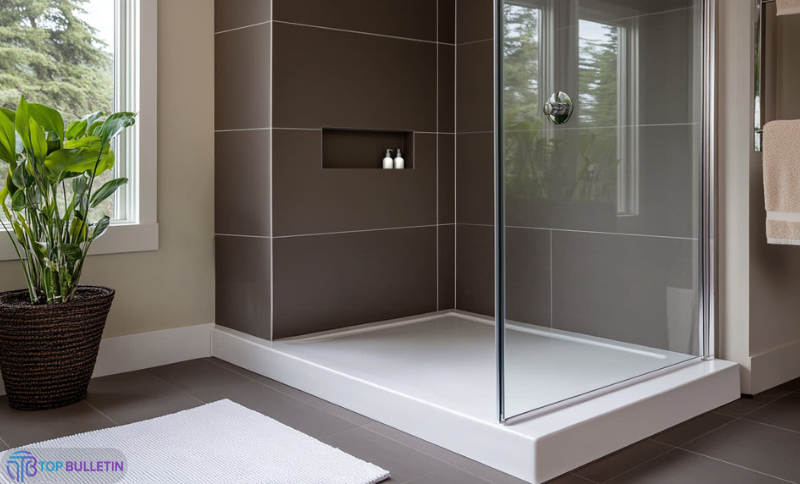
When you’re designing or remodeling a bathroom, one of the most overlooked yet essential components is the shower pan. It might not be the first thing you think about, but without it, your sleek new shower could turn into a disaster.
A shower_pan is what keeps the water in the shower and directs it safely into the drain. Whether you’re doing a DIY renovation or working with a contractor, understanding shower_pans is crucial. Let’s dive into the details and explore everything from shower pan sizes to the latest in curbless shower_pan designs.
What Is a Shower Pan?

A shower_pan is a waterproof barrier that sits on the floor of your shower. Its job is to catch water and funnel it down the shower_pan drain, preventing leaks and water damage.
There are different materials, styles, and designs to choose from. Some are tile ready shower pans, while others are designed for quick installation with kits.
Types of Shower Pans
Let’s break down the different types of shower_pans available today:
1. Pre-fabricated Shower Pans
These are ready-to-install and come in a variety of materials like acrylic, fiberglass, or composite.
-
Quick to install
-
Available in standard shower_pan sizes
-
Cost-effective
2. Tile Ready Shower Pans
These pans are specially made to allow tile installation on top. They’re waterproof and durable.
-
Ideal for custom finishes
-
Works with shower_pan liner
-
Compatible with popular systems like Schluter shower_pan
3. Custom Shower Pans
When you need a non-standard size or shape, a custom shower_pan is built on-site using mortar and a waterproof liner.
-
Fully customizable
-
Time-consuming installation
-
Best for unique layouts
Shower Pan Sizes and Shapes
Shower_pans are not one-size-fits-all. Standard shower_pan sizes range from 32” x 32” up to 60” x 42” or more. However, custom shower_pans can be built for larger or oddly-shaped spaces.
Popular shapes:
-
Square
-
Rectangle
-
Neo-angle
-
Curbless
For small bathrooms, compact pans save space, while larger bathrooms allow for expansive walk-in styles.
The Rise of the Curbless Shower Pan
One of the biggest trends in modern bathrooms is the curbless shower_pan. These are designed with no step or threshold, offering a sleek, barrier-free transition from the floor to the shower.
Why choose a curbless design?
-
Wheelchair accessible
-
Easier to clean
-
Minimalist aesthetic
You can install a curbless shower_pan using systems like the Kerdi shower_pan from Schluter, which ensures a watertight and flush finish.
Shower Pan Materials
Different materials offer various benefits. Here’s what to consider:
| Material | Benefits | Common Brands |
|---|---|---|
| Acrylic | Lightweight, easy to clean | Kohler, DreamLine |
| Fiberglass | Affordable, non-slip surface | Sterling, Swanstone |
| Tile (Custom) | Fully customizable, high-end look | Schluter, Wedi |
| Composite | Durable, scratch-resistant | Delta, American Standard |
If you’re aiming for a tiled finish, tile-ready pans or custom mortar pans are your best options.
Shower Pan Kits – A DIY Favorite
 Installing a shower_pan doesn’t have to be complicated. A shower pan kit simplifies the process with pre-measured materials and clear instructions.
What’s usually included?
-
Pre-sloped shower base
-
Shower_pan liner
-
Drain assembly
-
Waterproofing membrane
These kits are especially useful for DIYers wondering how to build a shower_pan without making costly mistakes.
Pros and Cons of Each Type
| Type | Pros | Cons |
|---|---|---|
| Pre-fab Pan | Easy, fast, affordable | Limited customization |
| Tile-Ready Pan | Custom finish, waterproof | Requires tiling skills |
| Custom Pan | Fully customizable | Labor-intensive, time-consuming |
| Curbless Pan | Sleek look, accessible | Advanced installation needed |
How to Build a Shower Pan (Step-by-Step)
If you’re up for a project, here’s a basic breakdown:
-
Prepare the subfloor – Ensure it’s clean, level, and dry.
-
Install the shower pan liner – This waterproof barrier is crucial.
-
Add the mortar bed – Use it to create slope towards the shower_pan drain.
-
Place the drain flange – Connect it securely.
-
Apply waterproofing membrane – Prevent leaks before tiling.
-
Tile and grout – Let everything cure fully before using.
Tip: Use systems like Kerdi or Schluter shower_pan kits for added waterproofing reliability.
Bio Table
| Feature | Details |
|---|---|
| Focus Keyword | Shower pan |
| Standard Sizes | 32×32, 36×36, 60×30, 60×42 |
| Customization | Yes, via mortar beds or custom kits |
| Curbless Option | Yes, ideal for accessibility and style |
| Waterproofing Required | Absolutely – use a shower pan liner or membrane |
| Tile-Ready Available | Yes, ready for immediate tile installation |
| Common Materials | Acrylic, fiberglass, mortar, composite |
Final Thoughts
A shower_pan might not get as much attention as your showerhead or tile, but it’s a core part of your bathroom’s functionality. Whether you want a curbless shower_pan, a Schluter shower_pan system, or a custom shower_pan, it’s all about balancing design, durability, and waterproofing.
By understanding the materials, sizes, and installation methods, you’ll make a smarter, longer-lasting choice for your home.
FAQs
Q1: What is the purpose of a shower pan?
A shower_pan catches water and guides it safely into the drain to prevent leaks or damage.
Q2: Can I install a shower pan myself?
Yes! Use a shower_pan kit for DIY or opt for professional installation if unsure.
Q3: What is the best material for a shower pan?
It depends—acrylic is easy, while tile offers a luxurious finish. Choose what suits your budget and style.
Q4: Are curbless shower pans safe?
Absolutely. They are safe, sleek, and perfect for barrier-free access, especially when installed properly.
Q5: How long does a shower pan last?
With proper installation and care, a shower_pan can last 10–30 years depending on the material.